Paging Space definition :-
Paging is the most important part of virtual memory implementation in most of the modern operating systems, allowing them to use disk storage for data that does not fit into physical random-access memory (RAM). Paging’s are used for memory management algorithm store and retrieve data from secondary storage for use in main memory when a program tries to access pages that are not currently mapped to physical memory (RAM).
By default , AIX operating system has the paging space named as hd6 and the default size is 512 MB , which is not enough if the RAM size is in GB’s.
Based on the RAM size we have create the paging space in the OS to support RAM.
CREATING PAGING SPACE FROM PAGGINGVG
STEP 1 :
In practical , I would say that keeping the huge size of paging space in rootvg is not the good idea so that always plan the secondary paging space devices from out off rootvg. Here we will check the available free disk to create the separate paging space.

STEP 2 :
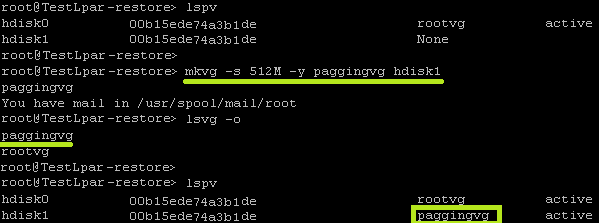
As you could see , hdisk1 is free we will create the pagingvg by using hdisk1
The syntax is :– mkvg -s 512M -y pagingvg hdisk1
Once you fire the command the volume group will created and you can check through lspv command which shows the newly created pagingvg.
STEP 3:
Now we will create the paging space from the volume group pagingvg by using the default AIX commands.
Paging Space calculations :-
This paging space standard size is based upon the memory workload in your environment and we found that below given calculation very much suitable for our workplace and the calculation is
If , RAM SIZE BELOW OR = 10 GB ==========>> (Memory Size * 2) = Swap Space
If , RAM SIZE MORE THEN 10 GB ==========>> (Memory Size * 0.75) = Swap Space
The syntax is:-
#mkps -a -n -s 60 paggingvg hdisk1
Where:-
Paggingvg Name: paggingvg
Hdisk Name : hdisk1
Size of the Paging Space in PPs : 60 PPs
STEP 4 :
Check your paging space which you ahve created newly by using. # lsvg -l paggingvg
STEP 5:
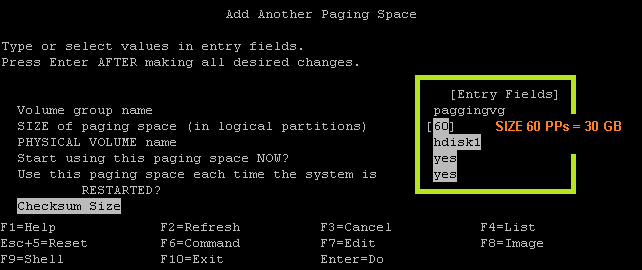
The same above option we can do it through smitty menu , if you are not familiar with
command line go with smitty which is pretty essay.. # smit mkps
Select the pagingvg from the volume group options, # smit menu
STEP 7:
We have define the attributes to create the paging space in the smitty menu , once you have done that even you can press Enter will give you the command which is going to execute.
INCREASING AND DECREASING PAGING SPACE:-
This could be a task to the Server Admins in frequent ,
STEP 8:
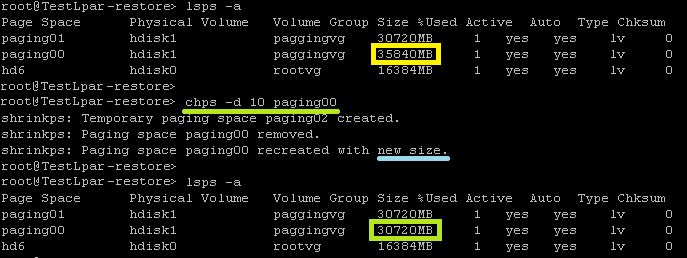
Increasing the paging space by using chps command and the syntax is
# chps -s <pp’s> <pagging_name>
STEP 9:
Decreasing the paging space by using chps command and the syntax is
# chps -d <pp’s> <pagging_name>
 PAGING SPACE ON AND OFF:-
STEP 10:
To list out the all the available paging space & the syntax # lsps -a
We would see the three paging space available out off that two are belongs to pagingvg and all are active.
Note:
There could be question in your mind that we should not keep the multiple paging space in the same disk , this is for test we kept like that.
STEP 11:
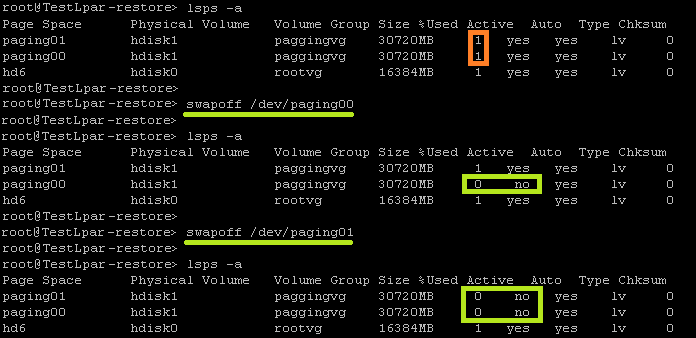
Switching off the paging space we use swapoff command # swapoff /dev/pagin00/01
STEP 12:
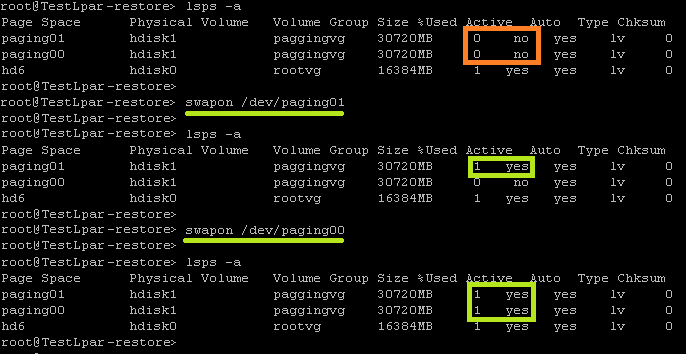
Switching on the paging space we use swapon command # swapon /dev/paging00/01
After switching off or on your paging space device its recommended that to validate the paging space. # lsps -a
REMOVING PAGING SPACE AND PAGINGVG
STEP 13:
List out all the available paging space # lsps -a
STEP 14:
Be sure that before removing your paging space we needs to de active the paging space by using swapoff command
# swapoff /dev/paging00
STEP 15:
Validate the paging space whether paging space deactivate or not. # lsps -a
STEP 16:
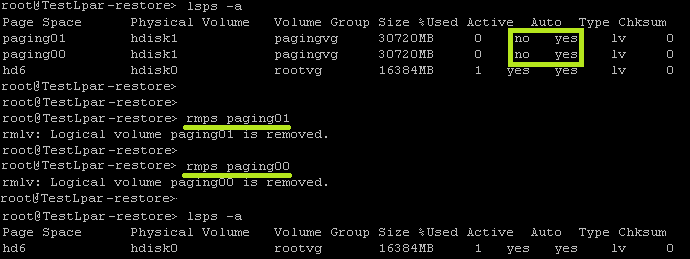
Remove the paging space device from OS by using rmps command
# rmps paging00 / paging01
 REMOVE PAGINGVG
STEP 17:
To list and ensure non of the logical volume open from your paging vg # lsvg -l paggingvg
STEP 18:
By using native AIX command reduce hdisk1 from paging vg # reducevg paggingvg hdisk1
You could see that the paging vg has been remove from the system
RESULT:
Paging Space management has been successfully configured in AIX operating system.
3 Comments
Leave a Comment
You must be logged in to post a comment.








looking forward for many more updates
please posts more topics , your updates are very nice & east to understand ,ty
very good description about paging space